
Whether you are crafting hero characters for cinematic cutscenes, optimizing modular environment kits for mobile titles, or generating procedural surface imperfections for archviz renderings, normal maps remain the primary bridge between polygon budget limits and photorealistic surface complexity. Yet, many 3D artists rely on a single, rigid method—often getting trapped in agonizing hours of baking cage adjustments when a procedural or AI conversion approach would deliver cleaner results in seconds.
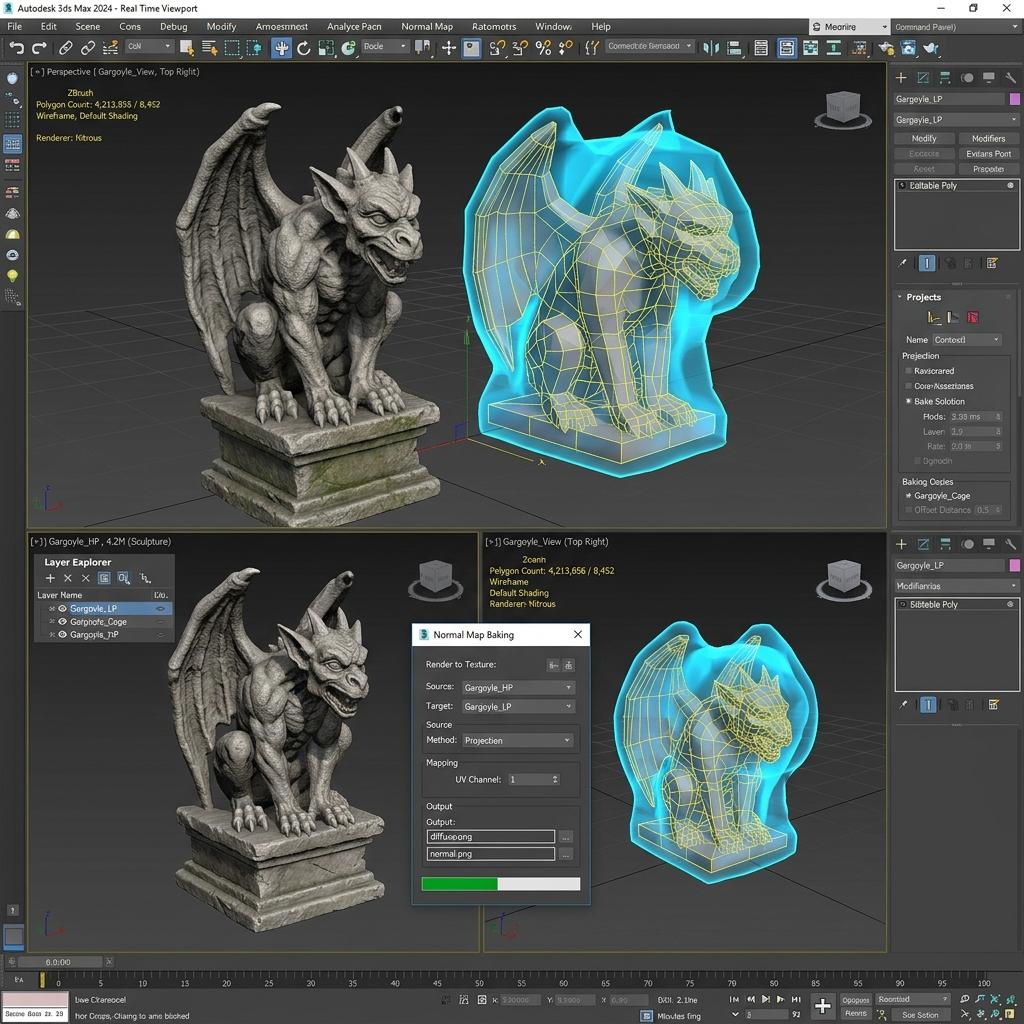
Selecting the optimal normal map creation workflow depends directly on whether your asset requires bespoke mechanical geometry or tileable organic relief.
Modern game studios and VFX facilities employ four distinct pipelines to generate normal maps. Understanding the strengths, limitations, and potential artifacts of each strategy will drastically accelerate your texturing throughput. Below is the comprehensive guide to normal map creation across all four industry workflows.
The 4 Production Workflows for Normal Map Creation
[Normal Map Creation Pipeline Decision Tree]
Asset Type:
  ├── Bespoke Hero Prop / Character ──> Workflow 1: High-to-Low Poly Baking (Blender / Marmoset)
  ├── Real-World Surface from Photo  ──> Workflow 2: AI-Powered Photo to Normal Generation
  ├── Infinite Tileable Shader Layer ──> Workflow 3: Procedural Noise & Node Math (Substance / Cycles)
  └── 2D Graphic Design / Alphas     ──> Workflow 4: Height Map Gradient Filtering (Photoshop / GIMP)
Workflow 1: High-to-Low Poly Projection Baking
The traditional foundation of game art pipelines. A high-resolution sculpted mesh (often millions of polygons sculpted in ZBrush or Blender) is projected onto an optimized low-poly game mesh (thousands of polygons with unwrapped UVs).
- Best for: Hard-surface weapon mechanics, hero creature anatomy, ornate props with complex silhouette transitions.
- Key advantage: Perfect alignment between low-poly smoothing vertex normals and baked surface curvature.
- Production trap: Requires meticulous UV packing, non-overlapping UV shells, cage mesh calibration, and identical smoothing group splits along UV seams.
Workflow 2: AI and Neural Photo Conversion
Modern neural vision generators analyze 2D photography or AI diffuse images, estimate surface illumination angles, delight shadows, and synthesize crisp tangent space vectors.
- Best for: Rapid environment art, scanned architectural masonry, terrain boulders, and organic foliage.
- Key advantage: Near-instant generation (
< 5 seconds) without modeling millions of polygons or configuring baking ray projection distances. - Production trap: Low-quality web tools produce rounded “pillow” embossing from uncorrected photo contrast. Always use calibrated PBR generators that delight diffuse lighting.
Workflow 3: Procedural Noise and Shader Graph Math
Constructing normal maps entirely inside node graphs (such as Blender Shader Nodes or Substance Designer) by blending mathematical noise generators (Voronoi, Perlin, Musgrave, Curvature).
- Best for: Tileable procedural materials like brushed metals, orange-peel car paint, cloth weaves, and dynamic water surfaces.
- Key advantage: Infinite resolution, zero UV texture seam tearing, and fully animatable parameters.
- Production trap: High procedural complexity increases GPU shader compilation times if not baked out to image textures before game engine deployment.
Workflow 4: 2D Height Map and Alpha Filtering
Deriving tangent normal maps from 2D grayscale height maps, hand-painted displacement masks, or vector typography using Sobel gradient filters.
- Best for: Stamped technical decals, serial numbers, bolt heads, seams, and UI relief panels.
- Key advantage: Pixel-level precision for alphanumeric labels, screw heads, and engraved military logos.
- Production trap: Lacks organic directional micro-detail; requires pairing with macro baked geometry.
Workflow Comparison Matrix
The table below summarizes the technical tradeoffs between all four normal map creation pipelines:
| Creation Workflow | Setup Time | Artistic Control | Silhouette Matching | Risk of Baking Seams | Ideal Asset Scope |
|---|---|---|---|---|---|
| High-to-Low Poly Baking | High (30 - 120 min) | Total geometric precision | High (Projected ray cages) | Moderate (Requires UV split borders) | Weapons, characters, vehicles |
| AI Photo Conversion | Ultra Low (< 1 min) | High macro aesthetic | Low (Flat planar projection) | None (When tileable) | Walls, ground terrain, fabrics |
| Procedural Shader Nodes | Medium (15 - 45 min) | Mathematical proceduralism | None (Surface micro-relief only) | Zero (UV math seamless) | Metals, plastics, ceramics, water |
| 2D Height Filtering | Low (5 - 15 min) | Pixel-precise stamping | None (2D planar stamp) | Low (Decal borders) | Stencils, bolts, panel lines |
Step-by-Step Guide: Eliminating High-Poly Baking Artifacts
When high-to-low poly baking is unavoidable, following these four strict rules eliminates over 95% of all baking failures:
- Split UVs Along Hard Edges: Every sharp polygonal edge on your low-poly mesh where vertex normals break must have a corresponding seam in your UV layout. Baking across a hard edge without a UV split forces contradictory vector calculations across adjacent pixels, causing black seam fringes.
- Employ an Explicit Cage Mesh: Never rely on a raw ray distance slider when baking models with complex geometric cavities. Duplicate your low-poly mesh, push vertices outward along averaged vertex normals (using Blender’s Alt + S or 3ds Max Push modifier) until the cage fully encloses the high-poly sculpture, and bake using the cage object.
- Maintain Adequate UV Island Margins: Baking bleeding (padding) of at least
16pxfor 2K maps and32pxfor 4K maps prevents mipmap downsampling passes from bleeding#8080FFborders into visible textured polygons. - Match Your Green Channel Handshake: Verify engine requirements before export. Blender and Unreal Engine use DirectX (-Y) normal orientation, whereas Unity and Godot use OpenGL (+Y) orientation.
Normal Map Baking Troubleshooting Reference
| Baking Symptom | Root Cause | Immediate Production Solution |
|---|---|---|
| Wavy or skewed circular bolts | Vertex normals skewed across low-poly triangles | Add support loops or bake using an averaged/skew-corrected cage |
| Missing details / Hollow gaps | High-poly geometry poked outside the cage boundary | Expand cage vertices outward (Alt + S) until high-poly is covered |
| Harsh black lines along UV seams | Hard geometric edge baked without corresponding UV split | Mark UV seam along hard edge and pack islands with 16px padding |
| Inverted craters / Protruding dents | Inverted green channel between authoring and engine | Invert Green (Y) channel in image editor or engine texture settings |
Accelerate Your Normal Map Pipeline
Baking high-poly models for every environment tile or fabric swatch is an enormous drain on game development schedules. Modern technical artists combine high-poly baking exclusively for bespoke hero silhouettes while relying on dedicated AI tools for surface relief and tileable textures.
If you need to rapidly create production-quality normal maps with crisp tactile relief from scratch or photos, supercharge your pipeline with our Free Online Normal Map and PBR Generator — Try Gothic Stone Relief. You can also generate seamless modular surface patterns for 3D environments using our Seamless Texture Generator Online.
Normal Map Creation Production Checklist
- Low-poly hard edges matched 1-to-1 with UV layout seams.
- Explicit push cage created for complex intersecting high-poly geometry.
- Minimum
16pxtexture padding baked into empty UV gutters. - Target engine green channel orientation confirmed (DirectX vs OpenGL).
- Procedural and AI tools leveraged for flat surface relief to save baking time.
Related reading: Metal Normal Map PBR Guide · How to Set Up a Normal Map in Blender · Image to Normal Map Converter · How to Create a Normal Map from a Photo