
The quickest giveaway of synthetic, amateur 3D rendering is mathematical perfection. Real-world surfaces—from factory machinery and automotive body panels to interior floorboards—are in a constant state of decay, abrasion, and contamination. Every physical object collects human skin oils, airborne particulate fallout, hairline impact abrasions, and moisture staining. Integrating a dedicated grunge texture map into your Physically Based Rendering (PBR) pipeline is what elevates a sterile polygonal asset into a tangible, production-ready environment prop.
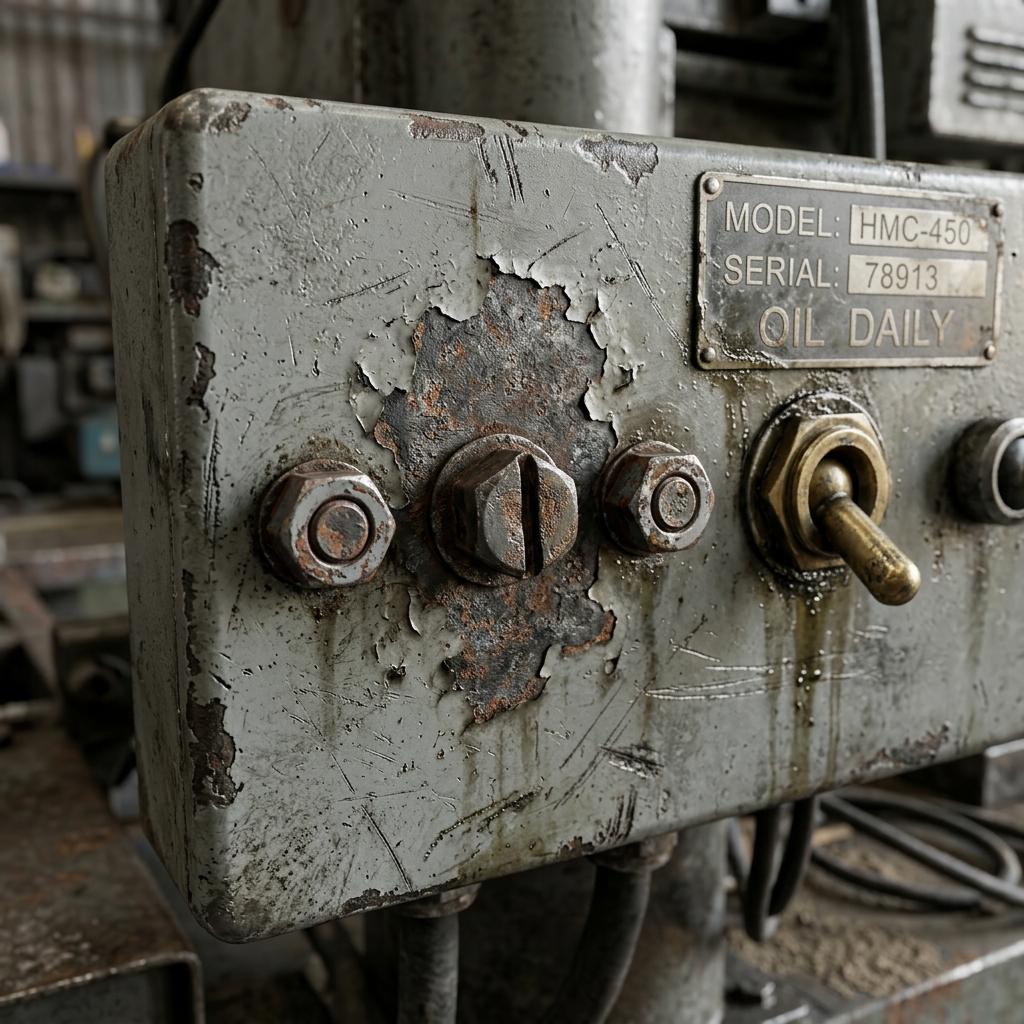
Layering grunge textures across multiple PBR channels—rather than simply multiplying dark splotches into diffuse color—creates realistic surface wear and tactile depth.
However, treating grunge textures as simple dark stains multiplied over an albedo map ruins the optical credibility of modern game assets. Realistic physical weathering occurs when grunge drives surface roughness variations, micro-normal deviations, and metallic substrate exposures. Below is the technical breakdown for selecting, routing, and balancing PBR grunge textures in Blender, Unreal Engine 5, and Unity HDRP.
Why Multiplying Grunge into Diffuse Color Breaks PBR
In legacy render pipelines (circa 2005), artists darkened surfaces by multiplying a grayscale grunge photo directly onto the diffuse texture. In a Physically Based Rendering pipeline, this produces unphysical results:
[Legacy vs Modern PBR Grunge Routing]
❌ Legacy Approach:
(Base Diffuse) ──[Multiply]──> (Final Color) [Breaks physical reflectance and energy conservation]
(Grunge Mask)  ──┘

✅ Modern PBR Multi-Channel Routing:
(Grunge Mask)  ──┬──> [Roughness Remap: 0.15 - 0.70] ──> [Principled BSDF: Roughness]
                 ├──> [Normal Height Derivative]       ──> [RNM Blend with Base Normal]
                 ├──> [Albedo Color Tint (Subtle)]     ──> [Principled BSDF: Base Color]
└──> [Substrate Mask (Expose Metal)] ──> [Principled BSDF: Metallic]- Light Absorption vs Surface Scattering: Dust or dried grease does not permanently dye a painted metal panel darker; instead, it scatters incoming specular light diffusely while reflecting faint dielectric tones.
- Loss of Fresnel Highlights: Darkening the Base Color while leaving Roughness uniform causes an object to look like wet paint with an unrealistic plastic film across both dirty and clean zones.
- Energy Conservation Violations:
Multiplying dark values into Base Color destroys physical albedo ranges, driving reflectance below the physical minimum for real-world dielectrics (
~0.04linear reflectance).
Anatomy of PBR Surface Imperfections
To build realistic weathering, break down your grunge assets into distinct physical phenomena:
- Micro-Scratches and Mechanical Abrasions:
Hairline scratches cut into the protective lacquer, stripping away specular clarity. Scratches must simultaneously push vector relief into the Normal map and elevate local values in the Roughness map to
0.55 - 0.80. - Fingerprint Smudges and Sebaceous Oil:
Oils transferred from human skin create thin translucent films that locally lower surface roughness to
0.08 - 0.18on matte surfaces, or raise roughness on high-gloss mirrors. Normal map displacement is negligible (sub-micron scale). - Airborne Dust and Particulate Fallout:
Atmospheric dust settles exclusively on upward-facing surfaces along world Z. Dust absorbs specular reflections (
Roughness: 0.80 - 0.95), desaturates Base Color, and pushes Metallic down to0.0. - Impact Chipping and Flaking Paint:
Heavy mechanical knocks fracture brittle topcoats, exposing bare oxidized steel beneath. This requires a sharp binary mask that drives Base Color (bare metal), flips Metallic from
0.0to1.0, and applies a step normal bevel along the fractured paint border.
PBR Grunge and Wear Parameter Calibration Table
The following matrix defines how five common industrial grunge types should be routed across PBR shader parameters:
| Grunge / Wear Type | Primary Target Channel | Base Color Response | Roughness Modification | Metallic Modification | Normal Map Behavior |
|---|---|---|---|---|---|
| Fingerprint Smudges | Roughness | Minimal change (< 3% tint) | Remap between 0.10 and 0.25 | Locked at 0.0 | Flat (#8080FF) |
| Industrial Grease / Oil | Roughness + Albedo | Darkens to amber/black (#15120D) | Extreme gloss (0.03 - 0.08) | Stays dielectric (0.0) | Soft planar puddle bevel |
| Airborne Dust Settling | Roughness + Mask | Desaturates to pale gray (#8A8780) | High matte scatter (0.85 - 0.95) | Forces metallic down to 0.0 | Very fine micro-noise (0.05 strength) |
| Paint Chipping / Flakes | Metallic + Normal | Exposes dark steel (#38393B) | Raw metal value (0.30 - 0.50) | Flips from 0.0 to 1.0 | High relief step border (0.80 - 1.20) |
| Fine Abrasive Scratches | Normal + Roughness | Subtle raw substrate tint | Crevices become matte (0.60+) | Stays unchanged | Sharp directional V-grooves (0.40 - 0.70) |
Step-by-Step: Building a Triplanar Grunge Shader
Applying planar 2D grunge textures to complex environmental meshes frequently results in obvious UV seams, stretching over vertical cliffs, and visible tiling repetition. Implement this triplanar blending setup in Blender or Unreal Engine 5:
-
Calculate World-Space Triplanar Coordinates: Project the grunge texture from the X, Y, and Z world planes simultaneously. Blend the three planar projections using the absolute value of the mesh surface normal as weights:
Weights = pow(abs(WorldNormal), BlendSharpness); Weights /= (Weights.x + Weights.y + Weights.z); FinalSample = SampleX * Weights.x + SampleY * Weights.y + SampleZ * Weights.z; -
Isolate Dust to Upward-Facing Surfaces: Take the dot product of the mesh world-space normal and a vertical unit vector
(0, 0, 1). Clamp the result to[0, 1]and feed it through a Smoothstep curve to generate a mask that deposits dust only on horizontal tops:float upDot = saturate(dot(worldNormal, float3(0, 0, 1))); float dustMask = smoothstep(0.4, 0.8, upDot) * grungeMapValue; -
Derive Tangent Normals from Grayscale Grunge: To give grunge depth without authoring separate normal files, compute screen-space derivatives or run a Sobel height-to-normal filter on your grayscale grunge texture. Blend the resulting micro-normal into your mesh base normal using Reoriented Normal Mapping (RNM).
-
Remap Output to Calibrated Roughness Ranges: Never feed raw 0-255 grayscale grunge textures directly into a roughness socket. Pure black creates an unphysical chrome mirror, while pure white looks like flat chalk. Use a
Map RangeorLinear Interpolatenode to constrain outputs between safe physical limits (e.g.,Min: 0.18,Max: 0.72).
Generating Custom Grunge and Weathered Textures
Hand-painting realistic grunge across dozens of modular game assets takes immense time and risks noticeable pattern repetition across contiguous walls. Modern procedural and AI texture generators synthesize seamless, multi-octave grunge masks that feature organic fluid stains, peeling paint borders, and realistic micro-scratches.
If you need to generate production-ready grunge normal maps, surface imperfection masks, and weathered PBR textures, power up your asset pipeline with our Free Online Normal Map and PBR Generator — Try Weathered Machinery Grunge. You can also generate seamless modular weathered wall and floor textures using our Seamless Texture Generator Online.
Grunge Texture Production Checklist
- Grunge routed primarily into Roughness, Normal, and Metallic channels rather than Base Color.
- Grayscale outputs remapped to physical limits (never unconstrained
0.0or1.0). - Dust layers restricted to upward-facing polygons using a World-Up dot product mask.
- Paint chip borders equipped with step normal bevels to simulate physical layer thickness.
- Triplanar mapping utilized on complex organic geometry to eliminate UV seam stretching.
Related reading: Roughness Map Guide · Metal Normal Map PBR Guide · How to Add Rough Texture in Blender · Normal Map Values Range Explained