
Importing game assets from Bethesda titles (like Skyrim or Fallout) into modern 3D software can be a frustrating experience. You use NifSkope to extract the .nif file, but when you import it into Blender, the model appears completely gray or bright pink, indicating that the textures are missing.
Understanding how to bridge the gap between NifSkope’s legacy rendering engine and Blender’s modern Principled BSDF shader is a critical skill for any 3D environment artist or modder.
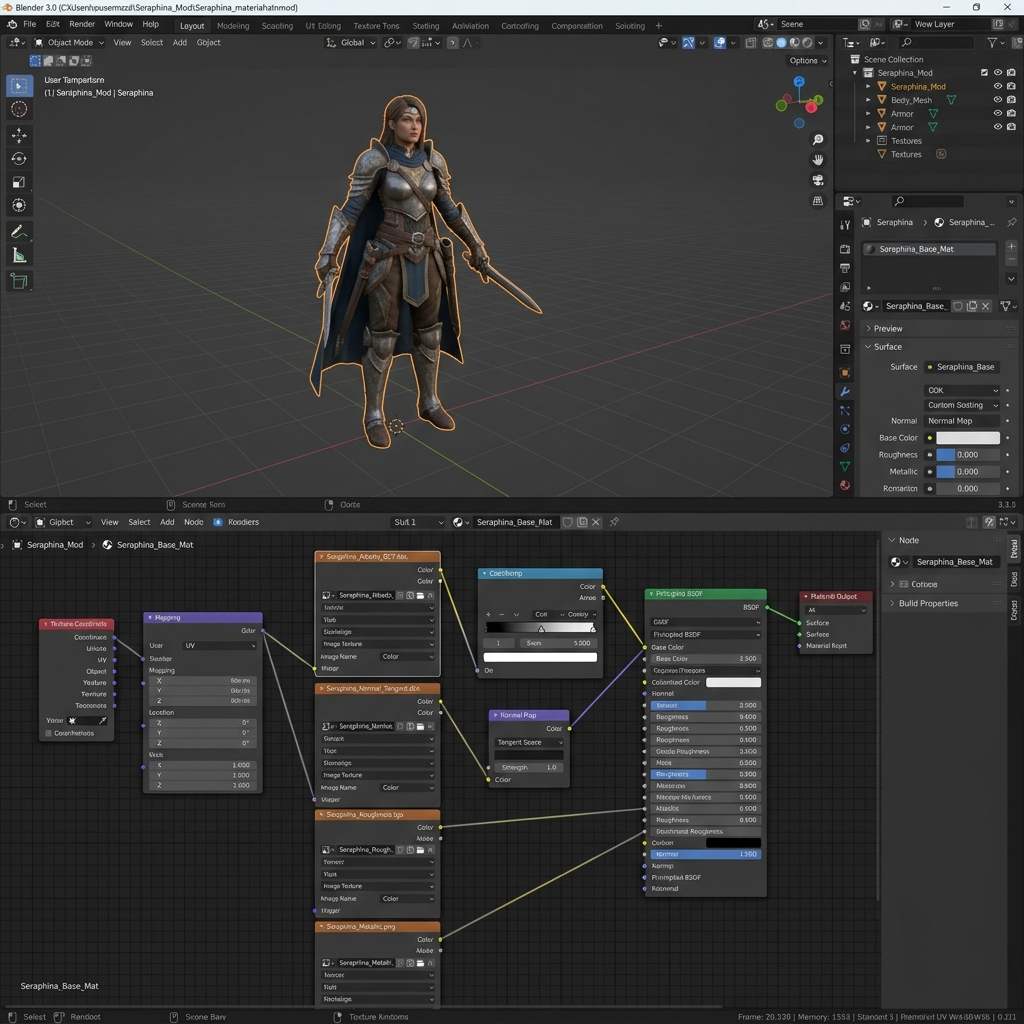 *Reconnecting diffuse and normal maps in Blender's Shader Editor is required after importing a .nif model.*
The Blender Niftools Addon Workflow
Blender cannot read .nif files natively. You must use the community-maintained Blender Niftools Addon. Ensure you are using a version of the addon that is compatible with your specific Blender version (e.g., Blender 4.x requires the latest release from their GitHub repository).
1. Installing the Plugin and Importing
- Download the Blender Niftools Addon
.zipfile. - In Blender, navigate to Edit > Preferences > Add-ons.
- Click Install…, select the
.zipfile, and check the box to enable it. - Go to File > Import > NetImmerse/Gamebryo (.nif).
- Select your extracted
.niffile and click Import.
Your 3D mesh should now appear in the viewport. However, the textures will likely be missing because the relative file paths embedded in the .nif do not match your local Windows directory structure.
2. Fixing Texture Paths in the Shader Editor
Bethesda games use proprietary texture pathing (like textures\armor\iron\iron_d.dds). When Blender reads this, it fails to find the file on your C:\ drive.
- Switch your Blender viewport to Material Preview or Rendered mode.
- Open the Shader Editor workspace.
- Select the imported mesh. You will see a
Principled BSDFnode connected to theMaterial Output. - The addon usually creates an
Image Texturenode, but it will be highlighted in pink or black, meaning the file is missing. - Click the Folder icon on the
Image Texturenode. - Manually navigate to the folder where you unpacked your
.ddstextures using a tool like Bethesda Archive Extractor (BAE). - Select the correct Diffuse (Albedo) map and click Open. The color should now appear on your model.
3. Connecting the Normal Map
NifSkope handles normal maps automatically if the filename ends in _n, but in Blender, you must set up the vector math manually.
- Add a new
Image Texturenode (Shift + A > Texture > Image Texture). - Open your normal map (
_n.dds). - Crucially, change the Color Space on this node from
sRGBtoNon-Color. If you skip this, your lighting will break. - Add a
Normal Mapnode (Shift + A > Vector > Normal Map). - Connect the
Coloroutput of the Image Texture to theColorinput of the Normal Map node. - Connect the
Normaloutput of the Normal Map node to theNormalinput of the Principled BSDF.
NifSkope to Blender Troubleshooting Table
If you encounter issues during the porting process, consult this diagnostic table:
| Symptom (现象/报错) | Primary Cause (根本原因) | Immediate Solution (快速解决方案) |
|---|---|---|
| Model is completely pink in Material Preview | Missing image files or broken paths | Relink the Image Texture node to the physical .dds file on your hard drive. |
| Mesh looks blocky, no smooth shading | Custom Normals data lost during import | Select mesh, go to Object Data Properties > Geometry Data > click Clear Custom Split Normals Data, then right-click and choose Shade Smooth. |
| Transparent parts (hair/glass) render solid black | Blend Mode is set to Opaque | In Material Properties > Settings, change Blend Mode from Opaque to Alpha Clip or Alpha Hashed. |
Upgrading Your Ported Textures
Porting older game assets often reveals their low resolution. A 10-year-old texture might look acceptable in NifSkope, but under Blender’s modern Cycles raytracing, it will look blurry and outdated.
If you need to rapidly generate high-resolution, modern PBR replacements for your ported models, power up your pipeline with our Free Online Normal Map and PBR Generator — Try Weathered Leather. You can also generate fully tileable environment materials to place your ported character into using our Seamless Texture Generator Online.
Related reading: Best Normal Map Creator Online · Image to Normal Map Converter · Convert Albedo to Normal Map