
Once you have learned the basics of setting up a texture canvas in Blender, the default round brush quickly becomes a limitation. Painting realistic dirt, rust, or skin pores requires highly specific brush shapes. Knowing how to texture paint in Blender using custom brush alphas is the key to escaping the “CGI look” and achieving professional, organic results.
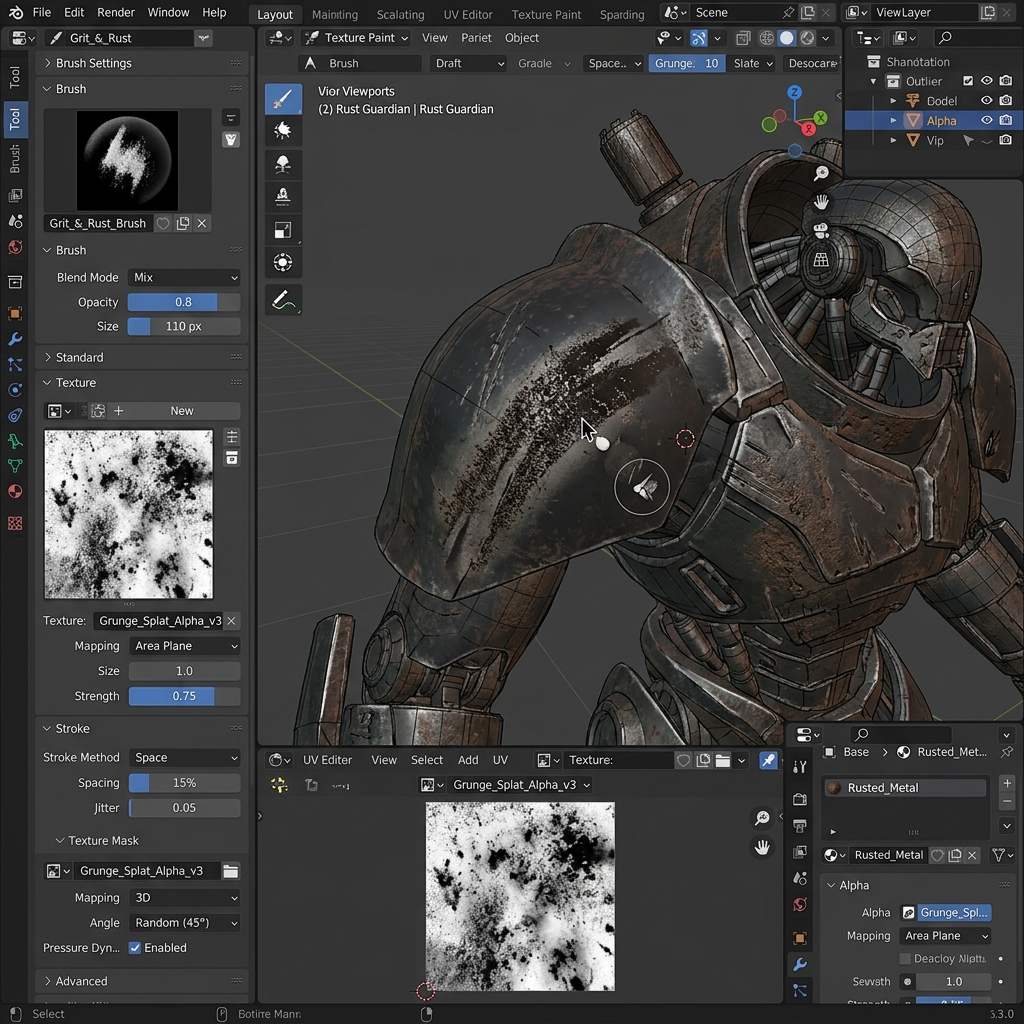 *Custom brush alphas allow you to stamp complex grit and rust patterns onto your 3D models with a single click.*
Understanding Brush Alphas in Blender
In the 3D industry, an “Alpha” is simply a black-and-white image used to define the shape of a brush. Where the image is white, paint is applied at 100% opacity. Where the image is black, no paint is applied. Gray areas apply semi-transparent paint.
By loading a picture of a real-world sponge, a scratch, or a splatter into Blender, you instantly convert that image into a painting tool.
Step-by-Step: Setting Up a Custom Brush
Follow this workflow to import and configure a custom brush alpha in Blender’s Texture Paint workspace.
1. Import the Alpha Image
- Enter the Texture Paint workspace.
- In the Properties window on the right, locate the Active Tool tab (the screwdriver and wrench icon).
- Scroll down to the Texture panel and click the
Newbutton. - Switch to the Texture Properties tab (the checkerboard icon at the bottom of the Properties window).
- Click Open and select your black-and-white alpha image (e.g.,
grunge_splatter.png) from your computer.
2. Configure the Brush Mapping
- Return to the Active Tool tab.
- Under the Texture section, look for the Mapping dropdown.
- By default, it is set to
Tiled. Change this to View Plane or Area Plane.- View Plane keeps the brush shape aligned to your screen.
- Area Plane aligns the brush to the surface normal of the 3D model.
3. Master the Stroke Methods
The way the brush behaves when you click and drag is controlled by the Stroke Method.
- Scroll down to the Stroke section in the Active Tool panel.
- The default is
Space, which leaves a trail of overlapping brush stamps. - Change it to Anchored. Now, when you click and drag on the 3D model, the brush stamp will grow in size instead of leaving a trail. This is perfect for placing specific scratches or decals.
- Try Drag Dot. This leaves exactly one stamp of your brush, which you can drag around the surface until you release the mouse button.
Texture Paint Brush Troubleshooting Table
| Symptom (现象/报错) | Primary Cause (根本原因) | Immediate Solution (快速解决方案) |
|---|---|---|
| Brush alpha paints as a solid square | Image lacks contrast | Ensure your alpha image is purely black and white, not a standard RGB photo. |
| Brush pattern rotates wildly while painting | Rake setting is enabled | Under Stroke > Jitter, disable Rake, or set it to 0 if you want a fixed angle. |
| Brush strokes look pixelated on the model | Base texture resolution too low | The brush alpha cannot exceed the resolution of the image you are painting onto. Create a new 4K canvas. |
Generating Unique Brush Alphas
Relying on the same five downloaded grunge brushes makes your 3D models look identical to everyone else’s.
If you need to rapidly generate bespoke, high-contrast brush alphas for your specific project, power up your pipeline with our Free Online Normal Map and PBR Generator — Try Grunge Masks. You can also generate fully tileable background noise patterns to use as brush textures using our Seamless Texture Generator Online.
Related reading: Blender Texture Painting Setup · Advanced Texture Paint Tips · How to Draw Texture for Digital Art