
One of the most frequent stumbling blocks for creators building custom experiences in Unreal Editor for Fortnite (UEFN) is attempting to swap out the default surface finish on an Epic-provided prop. You place a standard shipping crate, concrete barrier, or modular wall piece into your level, drag a custom PNG or texture asset directly onto its mesh in the viewport, and immediately encounter either a read-only restriction error or a broken, stretched material.
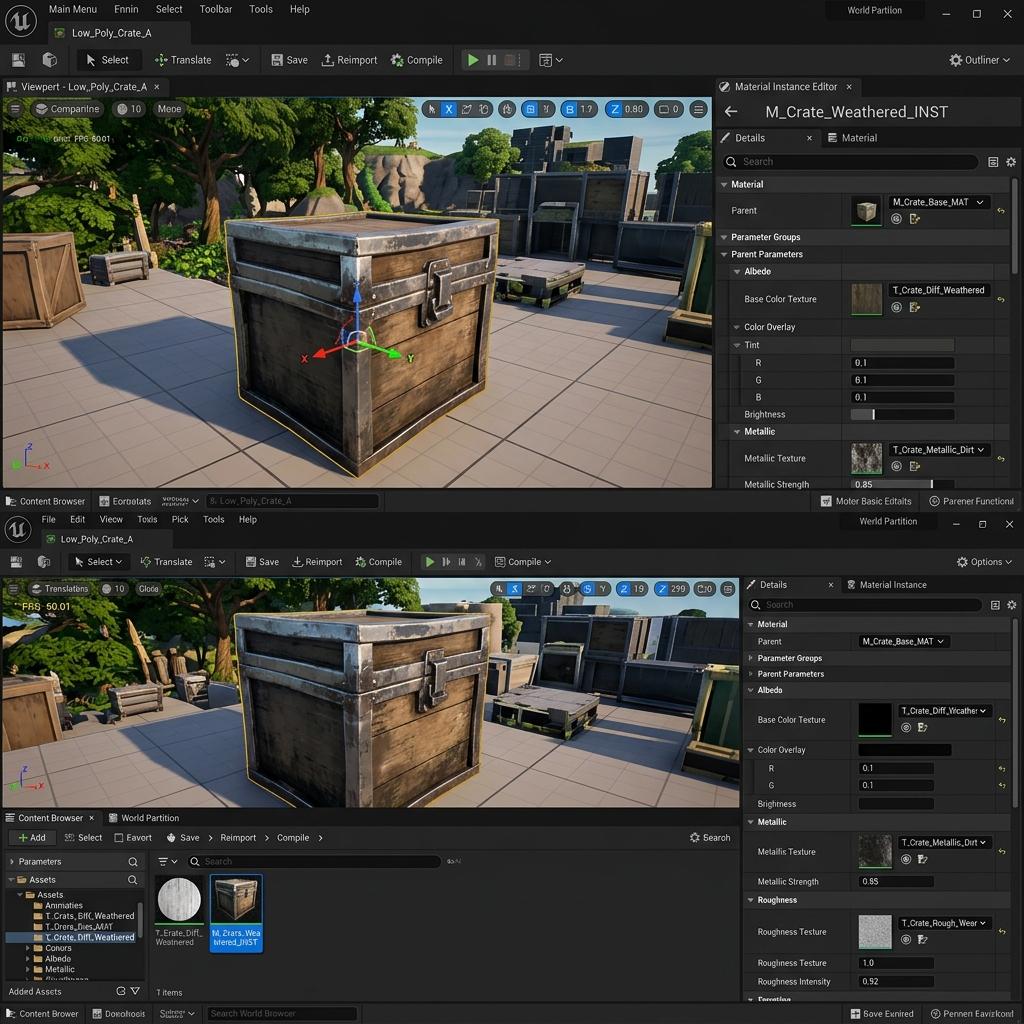
Assigning a custom Material Instance to an existing UEFN prop allows you to override default albedo and normal maps without modifying read-only core geometry.
Because UEFN operates on a locked asset hierarchy where native Fortnite creative props are protected against direct geometric overwrites, changing textures requires a structured Material Instance (MI) override pipeline. Whether you want to turn a pristine metal barrel into a rusted industrial hazard or replace standard brickwork with stylized sci-fi paneling, below is the exact technical workflow to successfully change textures on any existing prop in UEFN.
Why Simply Dragging Textures Onto UEFN Props Fails
In standard Unreal Engine 5 projects, developers often open a Static Mesh asset and directly reassign slots in the Material details panel or edit the underlying parent shader. However, UEFN introduces strict read-only boundaries between Epic Content (the built-in library of Fortnite assets) and Project Content (your custom imported files).
When you attempt to modify an Epic prop directly, three mechanical roadblocks occur:
- Read-Only Core Assets: Epic Content prop meshes and parent materials reside in read-only packages to maintain synchronization with fortnite creative servers across different platforms.
- Missing Texture Parameter Overrides: If the prop uses a complex layered master shader without exposed texture parameters, dropping a standalone diffuse bitmap onto the object either replaces the entire shader with a flat unlit texture or gets rejected by the editor.
- UV Space Mismatches: Many Fortnite modular building assets rely on packed trim sheets or UDIM layouts rather than 0-to-1 unique UV unwraps. Applying a standard tileable texture directly onto a trim-sheet prop results in scrambled, misaligned pattern blocks.
[UEFN Prop Material Override Pipeline]
Epic Content Prop Mesh (Read-Only)
               │
               ▼
[Step 1: Duplicate / Create Material Instance in Project Content]
               │
               ▼
[Step 2: Expose & Enable Texture Parameter Checkboxes]
       ├── Albedo / Base Color Parameter   ──> Assign Custom Base Color Map
       ├── Normal Map Parameter            ──> Assign Custom Normal Map (NormalMap Space)
       └── ORM / RMA Roughness Parameter   ──> Assign Packed PBR Texture
               │
               ▼
[Step 3: Assign Instance to Prop Actor in Viewport Details Panel]
Step-by-Step Workflow to Change Prop Textures in UEFN
To cleanly apply custom textures without triggering validation errors or breaking creative publishing guidelines, you must bridge your custom asset directory with the target prop actor using Material Instances.
1. Locate and Extract the Target Prop’s Material
- Select the target prop actor inside your UEFN 3D Viewport.
- Look at the Details panel on the right side of the screen and scroll down to the Materials section.
- Click the small magnifying glass icon (
Browse to Asset in Content Drawer) next to the assigned material slot (Element 0). This opens the Content Drawer and highlights the source material asset inside the Epic Content folder. - Since you cannot modify this read-only material directly, right-click the highlighted asset and select Create Material Instance.
- When prompted, choose a location inside your Project Content folder (for example,
/All/ProjectName/Materials/MI_CustomCrate_01) and save the new instance.
2. Configure Parameter Overrides in Your Material Instance
- Double-click your newly created Material Instance (
MI_CustomCrate_01) in the Content Drawer to open the Material Instance Editor. - Look at the Details panel under the Global Vector Parameters and Global Texture Parameters headers. Here you will see all exposed slots from Epic’s master shader.
- Check the enable box next to BaseColor_Texture (or
DiffuseMap) to activate the override. - Click the asset dropdown next to the parameter and select your custom imported Albedo texture asset.
- Check the enable box next to Normal_Texture (or
NormalMap) and assign your custom high-detail normal map. Ensure the normal map asset has its Texture Group set toWorldNormalMapinside its texture import settings so UEFN unpacks the compression correctly. - If the material exposes an ORM (
Occlusion/Roughness/Metallic) texture parameter, assign your packed PBR channel texture where Red represents Ambient Occlusion, Green represents Roughness, and Blue represents Metallic.
3. Apply the Custom Instance to the Prop in Your Level
- Return to the main UEFN level viewport and select the target prop actor.
- In the Details panel under Materials, click the dropdown menu for
Element 0. - Search for and select your new
MI_CustomCrate_01Material Instance. - If the prop has multiple material slots (for example, separate slots for metal trims, wooden slats, and decals), assign custom instances selectively to modify individual surface components while preserving the rest of the prop’s original look.
UV Layouts and Trim Sheet Considerations
Before importing your replacement textures into UEFN, check how the original prop’s UVs are mapped. You can inspect this by double-clicking the Static Mesh asset from the Details panel and enabling the UVs toggle (Show > UVs > UV Channel 0) in the mesh preview window.
- Unique 0-to-1 UV Unwraps: If the UV islands cleanly fill a square area without overlapping, you can apply custom hero textures, logos, and painted damage maps directly using standard 2048x2048 maps.
- Trim Sheets and Atlas Maps: If the UV islands are stacked in narrow horizontal bars across the texture space, the prop utilizes a trim sheet. To change its texture successfully without warping, your replacement texture must match the exact horizontal stripe spacing and height proportions of the original Fortnite trim layout.
- Tileable World-Aligned Surfaces: For walls, floors, and terrain props that use world-aligned (triplanar) projection, adjust the Tiling_Scale vector parameter (
1.0, 1.0) inside your Material Instance to scale the texture frequency up or down (2.5, 2.5) to match realistic environmental proportions.
Diagnostic Reference Table for UEFN Prop Texturing
| Symptom (Visual Error) | Primary Cause | Immediate Solution |
|---|---|---|
Editor forbids texture assignment (Asset is read-only) | Attempting to assign custom maps directly into read-only Epic Content material slots | Create a Material Instance saved inside your Project Content directory first |
| Normal map appears flat or creates dark inverted lighting holes | Custom normal map imported as Default (sRGB) instead of NormalMap linear space | Open texture asset details, change Compression Settings to Normalmap (DXT5, BC5 on DX11) and uncheck sRGB |
| Texture pattern looks distorted, stretched, or sliced into strips | Prop geometry uses a trim sheet layout while your replacement map is a standard unique texture | Align your replacement texture detail to match the horizontal bands of the original asset’s UV layout |
| Prop appears shiny like wet plastic or pitch black in shadow | Missing ORM channel assignment or default roughness parameter set to 0.0 | In your Material Instance, enable the Roughness override and set the scalar value to at least 0.35 to 0.65 |
Creating High-Fidelity Custom Surfaces for UEFN Props
To make your Fortnite creative maps stand out from standard published islands, replacing generic albedo colors is only half the equation. Generating custom normal maps and roughness variations ensures that your props catch dynamic lighting, reflect lumen bounce light accurately, and exhibit realistic physical depth across every edge and seam.
If you need to rapidly convert real-world photos or concept art into production-ready normal maps and PBR textures tailored for UEFN prop overrides, upgrade your workflow with our Free Online Normal Map and PBR Generator — Try Weathered Crate Patina. You can also generate completely tileable architectural surfaces for modular wall props using our Seamless Texture Generator Online.
UEFN Prop Material Override Quick Checklist
- Target Material Instance saved inside
/All/ProjectName/(Project Content), notEpic Content. - Normal maps configured with
Normalmapcompression settings andsRGBdisabled. - ORM channel textures packed (
Red = AO, Green = Roughness, Blue = Metallic) and imported asMasks (no sRGB). - UV channel 0 layout verified (Unique 0-1 vs Trim Sheet alignment).
- Material Instance assigned to the level actor’s
Element 0slot in the Viewport Details panel.
Related reading: Normal Map Fundamentals · How to Use Normal Maps in Unity and UE5 · Best Normal Map Creator Online · Roughness Map Guide