
Whether you purchased a commercial anime model from Booth or downloaded an open-source base character, giving your VRChat avatar a distinct personal identity starts with editing its textures. While beginner creators often attempt to tint whole materials using basic color pickers in Unity, achieving vibrant eye highlights, custom clothing patterns, and realistic skin tone variations requires directly editing the underlying albedo and UV maps.
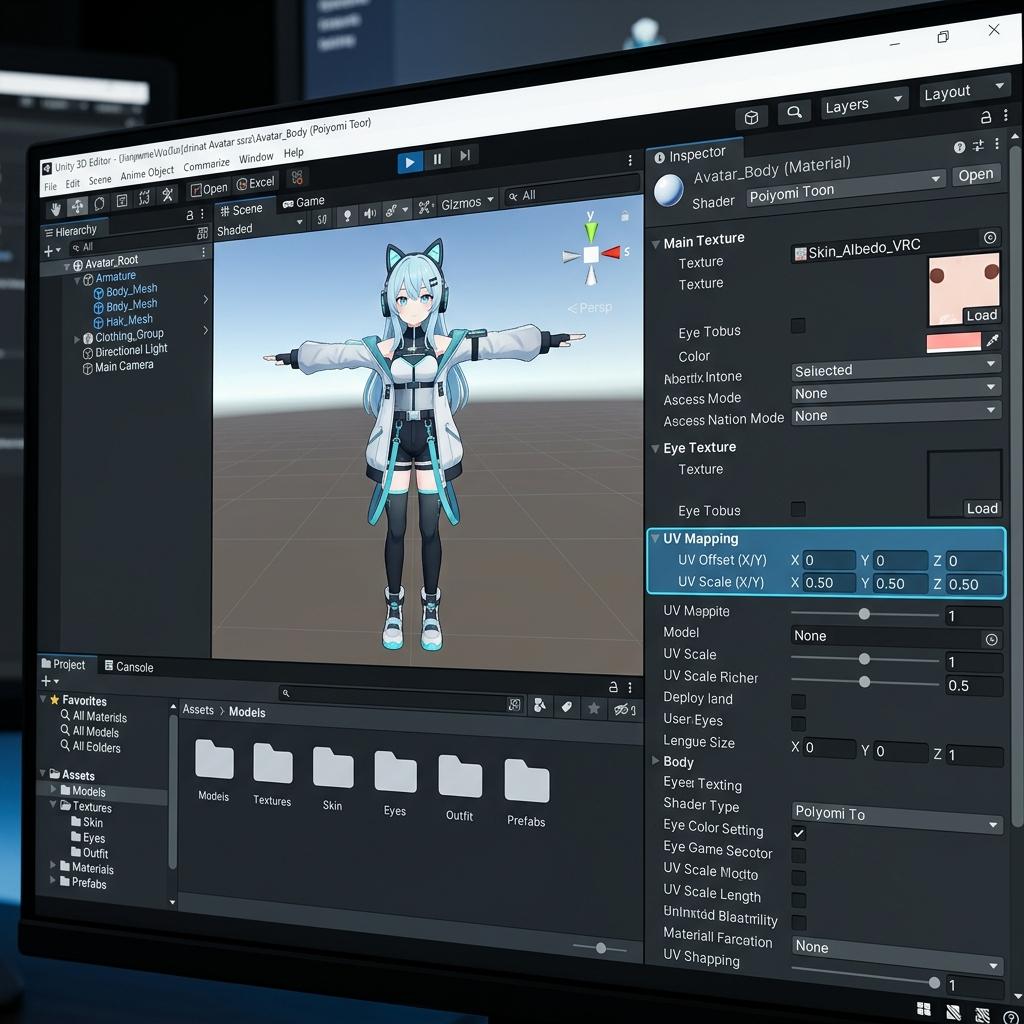
Editing source albedo maps in external image editors and configuring Poiyomi shader settings in Unity allows you to completely customize your VRChat avatar’s look.
However, editing VRChat textures without understanding Unity’s asset pipeline and shader requirements frequently results in washed-out colors, broken transparency layers, or glowing white seam artifacts. Below is the comprehensive technical guide on how to safely extract, modify, and reimport VRChat avatar textures using Unity and Photoshop or Procreate.
Understanding Your VRChat Avatar Texture Files
Inside your Unity project’s Assets folder, a typical VRChat character package separates surface data across several specialized image sheets:
- Body and Face Albedo (
Body_BaseColor.png): Contains the base diffuse coloring for skin, eyes, facial expressions, and blush layers, usually mapped across a 4096x4096 or 2048x2048 atlas. - Clothing and Outfits (
Outfit_Albedo.png): Holds fabric textures, metallic embroidery, laces, and ribbons. - MatCap and Shading Masks (
Shadow_Mask.png): Grayscale masks used by stylized shaders (such as Poiyomi Toon or lilToon) to dictate where crisp anime shadow steps occur or where metallic reflections shine.
[VRChat Avatar Texture Editing Pipeline]
Locate Source Texture in Unity Assets Folder
               │
               ▼
[Step 1: Right-Click Texture ──> Show in Explorer / Finder]
               │
               ▼
[Step 2: Open in Photoshop / Procreate with UV Overlay]
       ├── Add New Layer Above Source Albedo
       ├── Paint Eye Recolors, Tattoos, or Fabric Patterns
       └── Export as PNG (Preserve Alpha Channel for Cutout Mesh)
               │
               ▼
[Step 3: Unity Import & Shader Configuration]
       ├── Set Max Size to 2048 or 4096
       ├── Uncheck sRGB if editing Mask / Normal Data
       └── Assign to Poiyomi / lilToon Main Texture Slot
Step-by-Step Guide to Editing Avatar Textures
To modify your avatar without introducing compression artifacts or shifting the UV coordinates, follow this three-phase workflow.
1. Locate and Export Source Textures from Unity
- Open your VRChat avatar scene inside Unity 2022.3 (or the required VRChat SDK version).
- Click your avatar mesh in the Hierarchy panel to reveal its assigned materials inside the Inspector.
- Click the small thumbnail next to the Main Texture or Base Color property inside your shader UI (Poiyomi or lilToon). This highlights the original image asset in your Project window.
- Right-click the highlighted texture asset and select Show in Explorer (Windows) or Reveal in Finder (macOS).
- Copy the original PNG or PSD file to a dedicated backup folder before making any edits so you can always revert if a layer gets corrupted.
2. Modify UV Layers and Color Palettes in Photoshop or Procreate
- Open the copied texture file inside Adobe Photoshop, Clip Studio Paint, or Procreate on an iPad.
- If your avatar package included a UV Layout overlay sheet (
UV_Grid.png), import it as the top layer and set its blend mode to Screen or Multiply at30%opacity so you can clearly see polygon wireframe boundaries. - Never paint directly onto the base background layer. Create a new transparent raster layer above the original albedo map for your custom edits.
- To change eye colors precisely: use the Lasso Tool to select both eye iris circles, create a Hue/Saturation adjustment layer clipped to your selection, and adjust the Hue slider (
-180to+180) until you achieve your target shade. - To add skin details, tattoos, or clothing decals: paint on a fresh layer using soft brushes, ensuring your artwork stays strictly inside the wireframe islands of the target body part.
- Once finished, hide the UV Layout wireframe layer and export your updated image as a 24-bit PNG with transparency (
Save Copy As > PNG).
3. Reimport and Configure Color Compression in Unity
- Drag your newly exported PNG file back into your Unity project’s
Assets/Textures/directory, overwriting the old file or saving it alongside asBody_BaseColor_Edited.png. - Click the imported texture asset in the Project window to inspect its Import Settings in the Inspector panel.
- Verify that Texture Type is set to Default and Alpha Source is set to
Input Texture Alphaif your mesh requires cutout ribbons or eyelashes. - Set Max Size to
2048(or4096for high-resolution PC avatars) and ensure Compression is set toHigh Quality (BC7)to avoid blocky color banding across skin gradients. - Click Apply, then drag your edited texture directly into the Main Texture slot of your avatar’s material.
Diagnostic Table: Common VRChat Texture Editing Errors
| Symptom (Visual Bug) | Primary Cause | Immediate Solution |
|---|---|---|
| Texture appears washed out, overly bright, or greyish in Unity | Texture imported with incorrect color space (sRGB disabled on color albedo map) | Open asset import settings, check sRGB (Color Texture) for diffuse maps and click Apply |
| White lines or dark halos appear along clothing and neck seams | Painting exactly up to the UV wireframe edge without bleeding margin | Extend your painted colors at least 8px to 16px outside the UV island boundaries (edge padding) |
| Entire clothing piece or hair turns invisible after editing | Accidentally saved a blank alpha channel when exporting PNG from Procreate/Photoshop | Open material in Poiyomi/lilToon, change Culling & Alpha Mode from Cutout to Opaque |
| Custom decal or tattoo looks mirrored backwards on the other arm | The avatar’s UV layout shares overlapping mirrored islands across left and right limbs | Check if the 3D mesh shares symmetrical UVs; if mirrored, asymmetrical text must be separated in Blender |
Elevating Your Avatar with Custom Surface Normals
While repainting diffuse colors gives your character fresh styling, adding custom normal maps elevates your avatar from a flat 2D illustration into a tangible, reactive 3D presence. Normal maps allow fabric knits, leather jacket seams, metallic zippers, and skin pores to catch real-time world lights across VRChat worlds without adding a single extra triangle to your polygon budget.
If you have designed a custom clothing outfit or fabric pattern and want to generate instant studio-quality normal maps and roughness masks from your artwork, power up your VRChat creation pipeline with our Free Online Normal Map and PBR Generator — Try Stylized Anime Fabric. You can also craft high-detail seamless textile patterns for your character hoodies and skirts using our Seamless Texture Generator Online.
VRChat Texture Editing Quick Checklist
- Backup original PSD/PNG files before applying permanent color adjustments.
- Paint all modifications on isolated layers above the base albedo.
- Ensure edge bleeding (
8px+padding) around all UV seams to prevent edge halos. - Verify
sRGBis enabled for Base Color textures and disabled for Normal/Mask textures. - Assign updated textures to the Poiyomi/lilToon Main Texture slot and check Culling mode.
Related reading: What is a Normal Map? · Blender Texture UV Mapping Guide · Why Adding a Texture Makes Your VRChat Avatar Invisible · Roughness Map Guide