Whether you are building a vast open-world environment in Unreal Engine 5, designing architectural visualizations in Blender, or creating materials for a mobile game in Unity, one concept is absolutely unavoidable: the Tileable Texture.
But what exactly makes a texture “tileable”, and why can’t you just use any standard photograph downloaded from the internet? This guide covers everything from the fundamentals of seamless wrapping to advanced techniques used in production game studios.
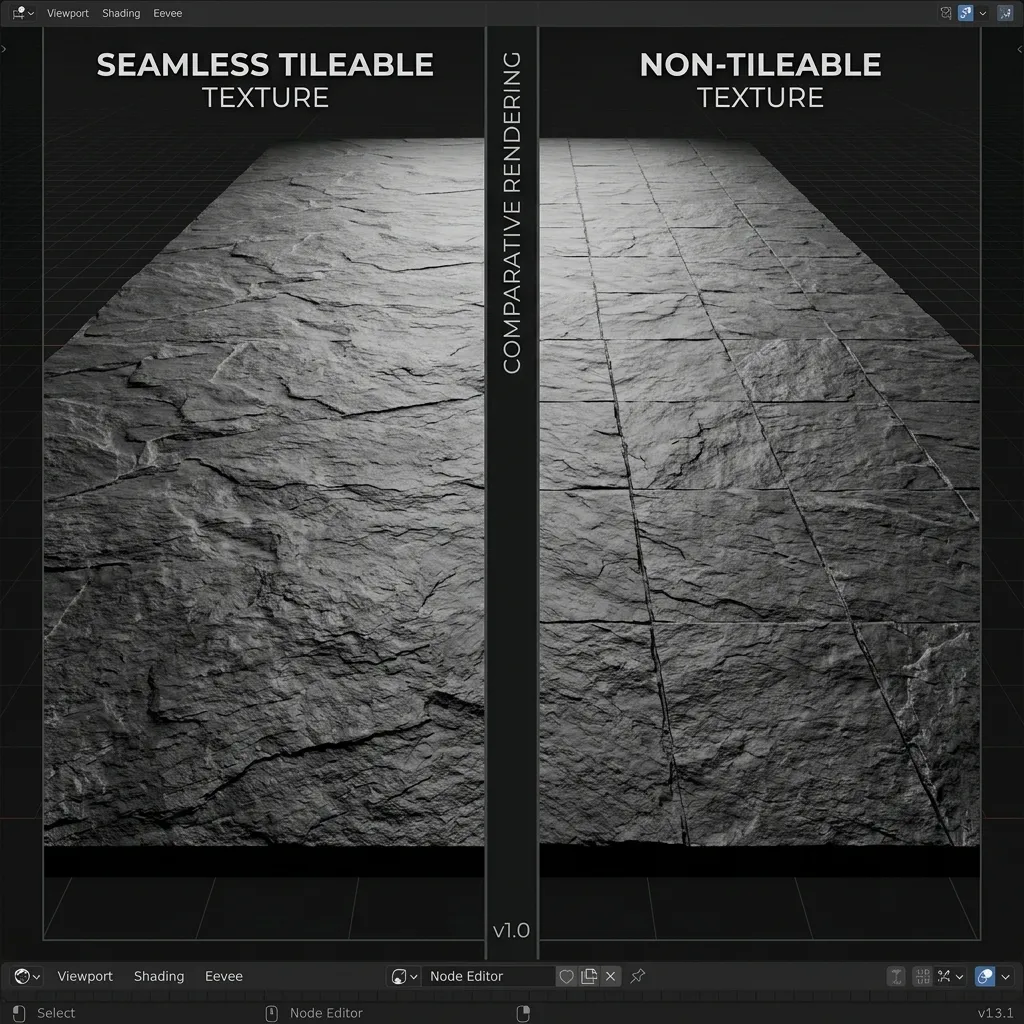
Comparison: A perfectly tileable seamless texture (left) vs. a standard un-processed image showing harsh grid seams (right).
What Does “Tileable” Mean?
A Tileable Texture (often called a Seamless Texture or Repeating Texture) is an image file that has been mathematically processed so that its left edge perfectly matches its right edge, and its top edge perfectly matches its bottom edge.
When you place this image side-by-side with exact copies of itself — like laying tiles on a bathroom floor — the boundaries between the copies are completely invisible. The viewer sees a continuous, endless material rather than a grid of stamped photos.
The “Seam” Problem
Take a picture of a brick wall with your smartphone. The bricks sliced off on the far left side of the photo will not perfectly align with the bricks sliced off on the far right. If you use this image as a material on a 3D floor and scale it up so it repeats 10 times, you will see a prominent “crosshair” grid of mismatched pixels across the entire floor. These harsh boundary lines are called seams, and they are the number one visual artifact that breaks the immersion of any 3D scene.
Seams manifest in three distinct ways:
- Hard Edge Seams: The most obvious type — a sharp line where pixels on one side of the border don’t match the other side in color, brightness, or structure.
- Repetition Patterns: Even if edges are matched, a distinctive feature (like a large crack or a dark stain) repeats at regular intervals, creating a noticeable grid pattern that the human eye picks up instantly.
- Lighting Gradient Seams: When the original photograph has uneven lighting (e.g., brighter on the left, darker on the right), tiling creates alternating bands of light and dark across the surface.
Why Are Tileable Textures Essential?
The necessity of tileable textures comes down to fundamental hardware limitations and rendering efficiency in computer graphics.
Optimization & VRAM Memory Limits
Imagine you need to texture a parking lot that is 100 meters long.
- The Wrong Way: You could try to take a single, gigantic photograph of the entire parking lot. To ensure it looks sharp when the camera gets close to the ground, this image would have to be something like
128,000 × 128,000pixels. Loading a single texture that massive would immediately crash any GPU — even a professional RTX 4090 has only 24 GB of VRAM. - The Tileable Way: Instead, you use a small, high-quality photograph of concrete (
2048 × 2048pixels, approximately 16 MB uncompressed), perfectly process its borders to be seamless, and tell the 3D engine to repeat (or “tile”) that same image 50 times across the 100-meter mesh. It looks incredibly sharp up close, but only occupies a few megabytes of VRAM.
Draw Call Efficiency
Beyond memory, tileable textures also reduce draw calls. When a single material is reused across hundreds of surfaces, the GPU can batch all those surfaces into far fewer draw calls compared to using unique textures for every surface. This is critical for maintaining 60+ FPS in real-time applications like games and VR experiences.
Artist Workflow Speed
From a production standpoint, creating one high-quality tileable texture that works everywhere is vastly more efficient than painting unique textures for every wall, floor, and ceiling in a level. Studios like Epic Games, Naughty Dog, and CD Projekt RED rely heavily on tileable texture libraries combined with vertex painting and decals to create visually diverse environments from a small set of master materials.
Tileable Texture File Formats & Resolutions
Choosing the right resolution and file format for your tileable textures has a direct impact on visual quality, VRAM usage, and loading times.
Common Resolutions
| Resolution | Pixel Count | Typical Use Case |
|---|---|---|
| 512 × 512 | 262K pixels | Mobile games, distant background surfaces |
| 1024 × 1024 (1K) | 1M pixels | Mid-range surfaces, indoor walls |
| 2048 × 2048 (2K) | 4M pixels | Industry standard for most game textures |
| 4096 × 4096 (4K) | 16M pixels | Hero assets, close-up cinematics, archviz |
Pro tip: Always author your tileable textures at the highest resolution you can (4K), then let the engine generate mipmaps to automatically downscale for distant surfaces. This gives you maximum flexibility without wasting VRAM at runtime.
File Formats
- PNG: Lossless compression, supports alpha channels. Best for source files and web-based tools. Our Seamless Texture Maker exports PNG by default.
- JPEG: Lossy compression, smaller file sizes. Acceptable for diffuse/albedo maps where slight compression artifacts are invisible, but never use JPEG for normal maps or roughness maps — the compression destroys critical per-pixel precision.
- EXR / HDR: 16-bit or 32-bit floating point. Essential for displacement maps and HDR environment maps where values can exceed the 0–255 range.
- TIFF: Lossless, widely supported in DCC (Digital Content Creation) tools like Substance Painter and Mari.
Common Tileable Texture Mistakes
Even experienced 3D artists make these errors when creating or using tileable textures:
1. Ignoring Low-Frequency Lighting
You perfectly blend the edges of a grass photograph, but the original image was taken with the sun on the left. When tiled, the left side of every tile is bright and the right side is dark — creating obvious vertical stripes across your entire terrain. The fix is a delighting pass that normalizes the ambient illumination before edge blending.
2. Over-Relying on Mirroring
The simplest way to make a texture tile is to flip it horizontally and vertically. This works for abstract noise textures, but for anything with structure (bricks, wood grain, fabric weave), mirroring creates an obvious “butterfly” or “kaleidoscope” pattern that looks completely unnatural.
3. Tiling at the Wrong Scale
A texture that tiles beautifully at 2× repetition might look terrible at 10× repetition because the human eye starts recognizing the repeating pattern. Always test your tileable textures at multiple tiling densities in your 3D viewport before committing to a final version.
4. Forgetting PBR Consistency
If you make your diffuse/albedo texture tileable but forget to process the corresponding normal map, roughness map, and AO map with the same seamless treatment, the lighting will still break at tile boundaries. All PBR channels must be processed together.
How to Create a Tileable Texture
Creating a flawless tileable texture used to require hours of tedious “clone stamp” tool work in Photoshop, manually blending the edges and trying to balance the lighting brightness across the canvas. Today, advanced algorithms handle this instantly.
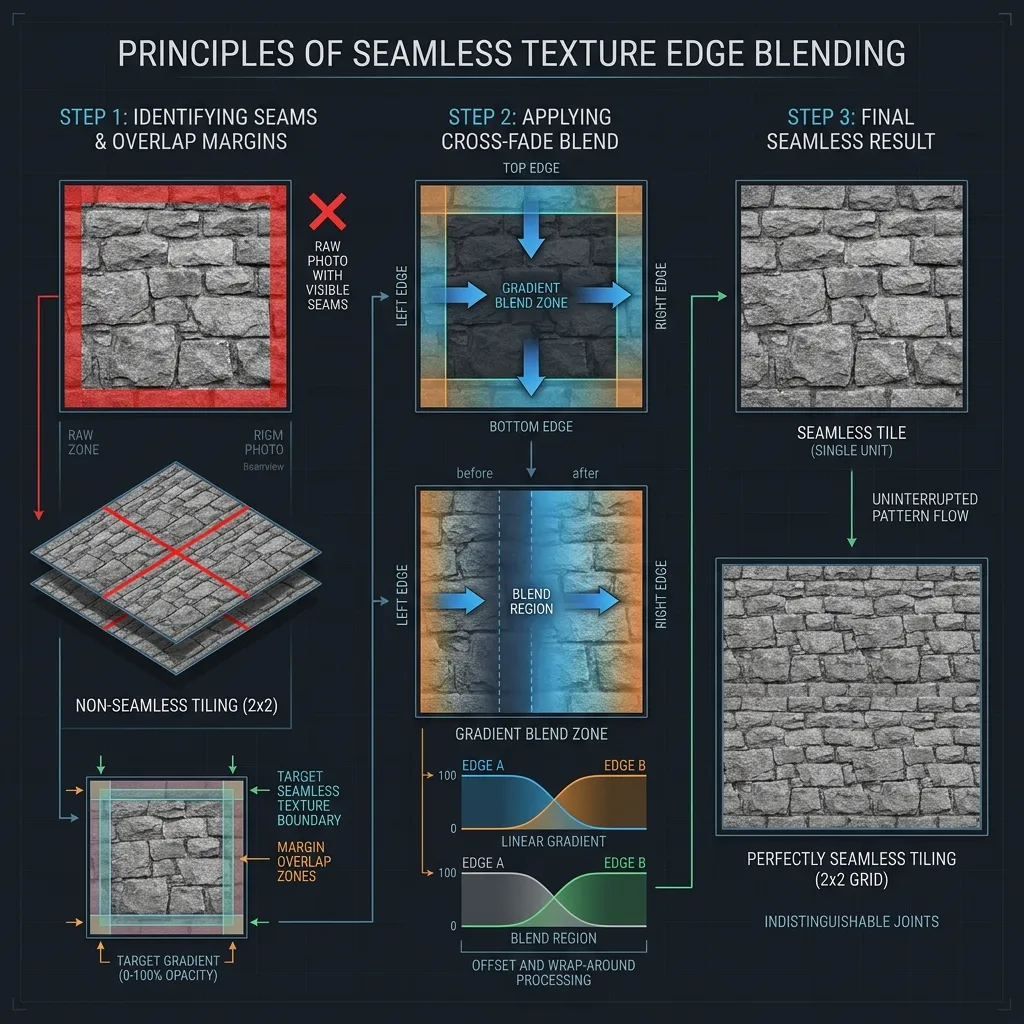
The three-step process: raw edges → overlap blending → seamless result tiled 2×2.
Step 1: Address Edge Matching (Min-Cut / Pixel Padding)
The core requirement is that pixels on the X=0 border mathematically mirror pixels on the X=width border. Advanced generators do this by overlapping the image margins and finding the “path of least resistance” (a min-cut seam) to organically cut and blend the two sides together, preserving the natural structure of the material.
Step 2: Low-Frequency Balancing (Delighting)
Even if the edges match perfectly, if your photograph was slightly darker on the left side than the right side due to lighting, tiling it will create a repeating “zebra stripe” pattern of shadows. A true tileable texture workflow includes a “delighting” pass to flatten the ambient light variance across the entire image.
Step 3: Structure-Aware Patch Repair
After edge matching and delighting, some textures may still show subtle repeated blotches or smeared areas near the seam line. A structure-aware patch repair algorithm analyzes the surrounding context and inpaints the seam area with content that matches the texture’s natural grain, eliminating any remaining artifacts.
Tileable Textures in Game Engines
Each major game engine has its own system for controlling how tileable textures are applied and repeated across surfaces.
Unity (Built-in / URP / HDRP)
In Unity, you control tiling through the material’s Tiling property (X and Y). Setting Tiling = (4, 4) repeats the texture 4 times in each direction. For terrain, Unity’s Terrain system uses Terrain Layers where each layer has independent tiling scale.
Unreal Engine 5
UE5 uses Texture Coordinate nodes in the Material Editor. Multiply the UV coordinates by a scalar to control tiling density. UE5 also supports World-Aligned Textures that tile based on world position rather than UV coordinates — extremely useful for seamlessly texturing landscapes and modular architecture kits.
Blender (Cycles / EEVEE)
In Blender’s Shader Editor, the Mapping node controls UV scale for tiling. The Texture Coordinate → Object output is particularly useful for making textures tile consistently across multiple separate mesh objects without UV seam breaks.
Tileable vs. Trim Sheet vs. Texture Atlas
Tileable textures are not the only technique for efficiently texturing 3D environments. Understanding when to use each approach is key to professional-quality results.
| Technique | How It Works | Best For |
|---|---|---|
| Tileable Texture | Repeats infinitely with invisible seams | Large uniform surfaces: walls, floors, terrain |
| Trim Sheet | A single texture containing multiple surface strips, mapped via custom UVs | Modular architecture: window frames, baseboards, pipes |
| Texture Atlas | Multiple unique textures packed into one image to reduce draw calls | Props, characters, UI elements |
In practice, AAA game environments combine all three: tileable textures for base surfaces, trim sheets for architectural detail, and atlases for props and hero assets. The tileable texture remains the foundation of this workflow.
Frequently Asked Questions
Is a tileable texture the same as a seamless texture? Yes, the terms are interchangeable. “Tileable” emphasizes the ability to repeat without visible borders, while “seamless” emphasizes the invisible edge blending. Both refer to the same end result: a texture that can be placed edge-to-edge with copies of itself and produce a continuous surface.
What resolution should my tileable texture be? For most game development and real-time rendering, 2048 × 2048 (2K) is the industry standard. Use 4K for hero surfaces and close-up cinematics. For mobile games, 1K or even 512 may be sufficient. Always author at the highest resolution and let mipmapping handle the downscale.
Can I make any photograph tileable? Technically yes, but results vary dramatically. Photographs with relatively uniform content (grass, gravel, fabric) convert easily. Images with strong directional lighting, large unique features, or perspective distortion require more manual cleanup before automated tools can produce clean results.
Do I need to make my normal map tileable separately? If you process your diffuse texture first to be tileable, then generate the normal map from the tileable result, the normal map will automatically be tileable too. Our Normal Map Generator works exactly this way — feed it your seamless base and every PBR channel it produces will tile perfectly.
Common Tileable Surface Types & Material Library Guides
Different materials present unique challenges when creating tileable patterns. Explore our specialized guides for architectural finishes, organic landscapes, and textiles:
- Architectural & Hard Surfaces: Master tileable Concrete Textures, Cinder Brick Walls, Polished Marble, Venetian Terrazzo, Microtopping Plaster, and Moroccan Stucco.
- Wood, Metals & Glass: Learn how to tile linear directional surfaces like Natural Wood Grain, Brushed Brass Metal, Grey Lacquer Finishes, and Painted Glass Textures.
- Terrain & Organic Ground: Avoid visible grid repetition on landscape surfaces with our guides on Seamless Grass Terrain, Dirt & Sand Ground, and dynamic Water Surface Caustics.
- Fabrics & Paper: Build high-detail tileable normal maps for Boucle Rugs & Carpets, Knit & Fish Net Clothing, and Watercolor Craft Paper.
Create Your Own Tileable Textures Instantly
If you have a photograph of a surface (like grass, rock, fabric, or asphalt) and need to use it in a 3D engine, our browser-based tool can convert it in seconds:
- Go to the Seamless Texture Maker.
- Drop your non-tileable photo into the tool.
- The tool will automatically run edge-blending, delighting, and patch repair algorithms.
- Use the built-in 3D viewer to test the new tileable texture across a sphere or plane at multiple tiling scales.
- Export the tileable base, and instantly send it to the Normal Map Generator to extract its height, normal, and roughness maps for a complete PBR material set.
Everything runs 100% locally in your browser using GPU acceleration. Your images are never uploaded to any server.
Related guides: Learn how to use the tool step-by-step in How to Create Seamless Tileable Textures Online, convert any image into a seamless pattern in Make Image Seamless Texture Online, or understand the PBR maps that complement your tileable textures in What is a Normal Map? and Roughness Maps Explained.